2018年3月17日土曜日

Google Homeに話しかけて、家のRaspberry Piで処理する

Google Homeを購入したのですが、Google Homeにはホームネットワークにコマンドを送信したりする機能がありません。ここは残念なところで、 Apple の HomeKit の様にもっと「Home」を全面に出した機能が欲しいものです。
そこで、今回は Google Home に話しかけたコマンドを家の Raspberry Pi で処理するための手順をまとめます。

Google Homeの購入

Google Home Mini をビックカメラのキャンペーン中に半額で購入しました。


今回の流れ


  1. Google Home Mini の設定
  2. Google の Firebase で Database を作成
  3. Raspberry Pi で Node.js のプログラムを作成
  4. IFTTT で Google Home Mini と Node.js の連携を設定

Google Home Mini の設定

iPhone 7 の Google Home アプリを使って設定しましたが、特に詰まるところはなく、スムーズに終えられます。

Google の Firebase で Database を作成

新規プロジェクトを追加

Firebase のコンソールで新規プロジェクトを追加します。


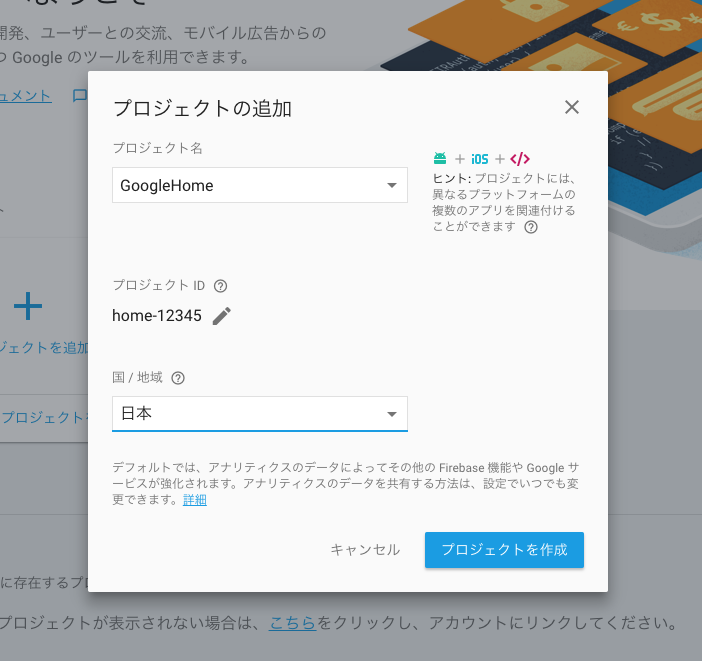
「プロジェクトを作成」ボタンを押してから、しばらく待つと新規プロジェクトが作成されます。
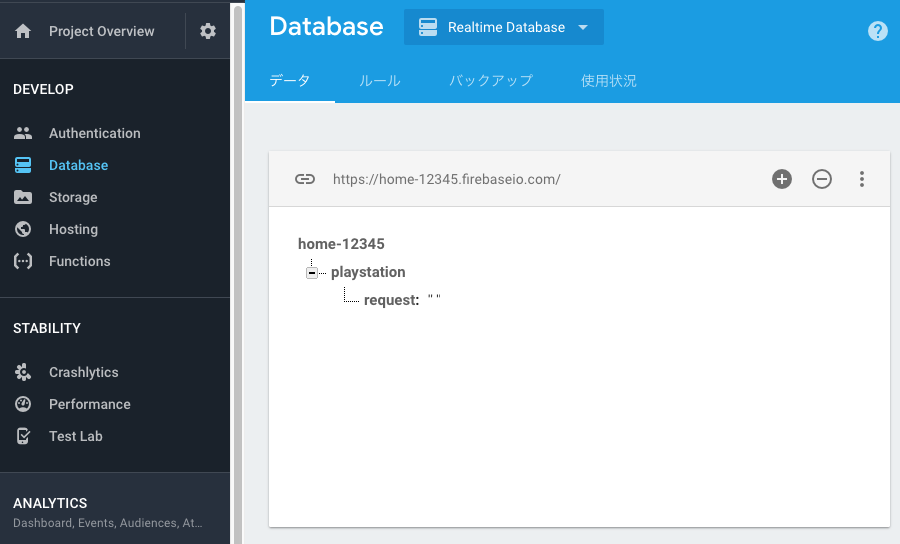
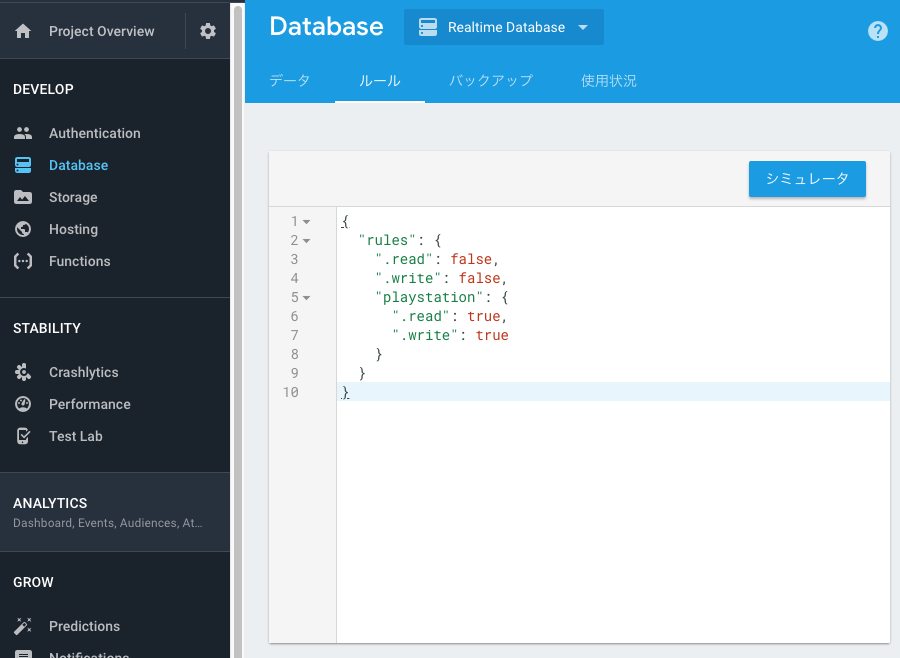
Database を作成

今回は、PlayStation4 を操作するので、以下の様にデータを定義してみました。


Database のルールを設定

今回作成した「playstation」のデータには、認証無しでアクセスさせるように設定します。


ここについては、そのうち権限設定を良い感じに設定出来るようにしたいです。
Firebase ドキュメント - データベース ルールを使ってみる
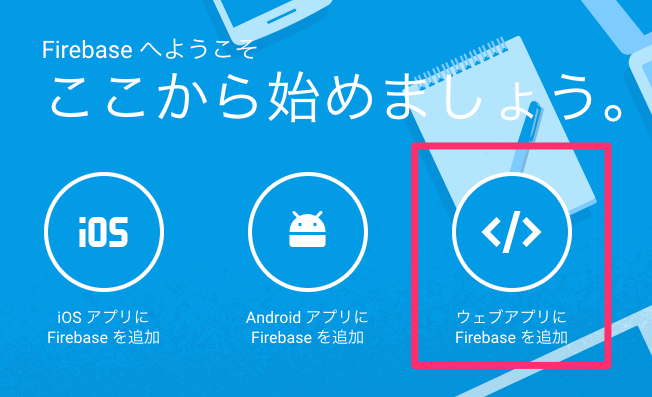
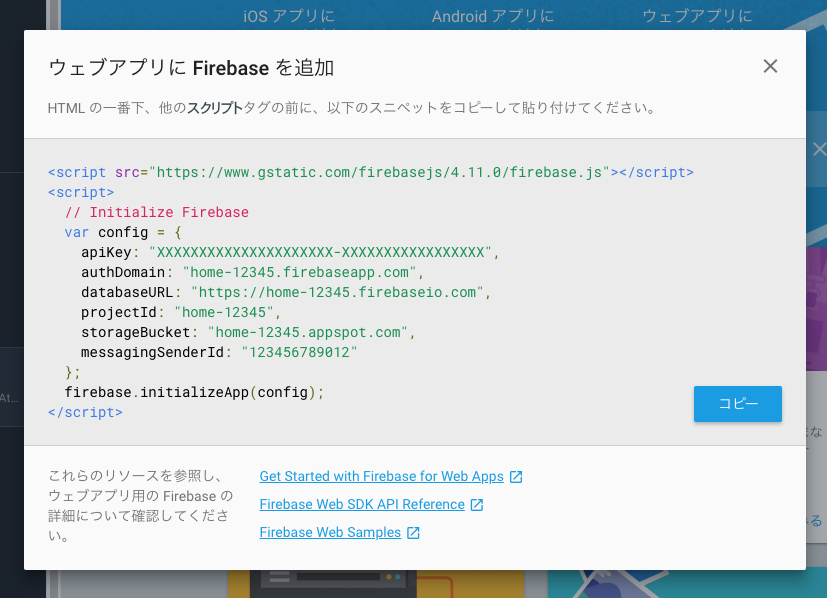

Firebase の設定を取得

「Project Overview」を押してプロジェクトトップに戻り、「ウェブアプリに Firebase を追加」からプロジェクトの設定をコピーします。


Raspberry Pi で Node.js のプログラムを作成

作成したアプリケーションは GitHub の GoogleHome リポジトリで公開しています。

PlayStation4 を操作するために ps4-waker を使います。

ps4-waker のインストール


$ cd /path/to/project
$ npm install ps4-waker --save

PlayStation4 を操作するためにクレデンシャル情報の取得

以下の手順でご自身の PlayStation4 を操作するためのクレデンシャル情報を取得出来ます。
  1. ps4-waker の起動
  2. スマートフォンで「PS4 Second Screen」アプリの起動
  3. PlayStation4 で PINコードを確認し、 ps4-waker に入力する
    • 「設定」→「モバイルアプリ接続設定」→「機器を登録する」を選択し、PINを表示

初回のみ、クレデンシャルが無いので /home/pi/.ps4-wake.credentials.json を作ります。作成時のみroot権限を求められます。

$ sudo ./node_modules/.bin/ps4-waker -c ~/.ps4-wake.credentials.json
No credentials; Use the PS4 Second Screen App and try to connect to PS4-Waker
Got credentials!  { 'client-type': 'i',
'auth-type': 'C',
'user-credential': 'XXXXXXXXXXXXXXXXXXXXXXXXXXXXXXXXXXXXXXXXXXXXXXXXXXXXXXXXXXXXXXXX' }
Go to 'Settings -> PlayStation(R) App Connection Settings -> Add Device' on your PS4 to obtain the PIN code.
Pin code> XXXXXXXX
Logged into device! Future uses should succeed

正常に取得できていれば、 PlayStation4 の状態が確認できます。
$ ./node_modules/.bin/ps4-waker search
{
  "type": "device",
  "statusLine": "200 Ok",
  "statusCode": "200",
  "status": "Ok",
  "host-id": "XXXXXXXXXXXX",
  "host-type": "PS4",
  "host-name": "PS4-123",
  "host-request-port": "997",
  "device-discovery-protocol-version": "00020020",
  "system-version": "05508011",
  "running-app-name": "torne™ PlayStation®4",
  "running-app-titleid": "CUSA00442",
  "address": "XXX.XXX.XXX.XXX"
}

Scripting API の利用

ps4-waker はコマンドだけではなく、スクリプトからも実行することができます。
const {Device} = require('ps4-waker');

var ps4 = new Device();
ps4.turnOn().then(() => ps4.close());  // 起動
ps4.turnOff().then(() => ps4.close());  // スタンバイ(電源のオフではないです)
ps4.startTitle('CUSA00442').then(() => ps4.close());  // トルネの起動

titleId は PlayStation Store の URL から取得することができます。
トルネの場合は、「https://store.playstation.com/ja-jp/product/JA0003-CUSA00442_00-TORNEPS400000000」なので「CUSA00442」となります。


自動起動するようにサービス化

自動起動のために、サービス化しました。こちらの設定については GitHub の RaspberryPi リポジトリで公開しています。

ユーザの追加
$ sudo useradd --system googlehome
$ sudo su googlehome -s /bin/sh

サービスの設定ファイル作成
$ vi /etc/default/google-home
# Defaults / Configuration options for google-home

# If you uncomment the following line, google-home will log more
# You can display this via systemd's journalctl: journalctl -f -u google-home
# DEBUG=*
NODE_PATH=/home/pi/Projects/GoogleHome/lib
$ sudo chmod 755 /etc/default/google-home
$ vi /etc/systemd/system/google-home.service
[Unit]
Description=Node.js GoogleHome Server
After=syslog.target network-online.target

[Service]
Type=simple
User=googlehome
EnvironmentFile=/etc/default/google-home
ExecStart=/usr/bin/node /home/pi/Projects/GoogleHome/app/index.js
Restart=on-failure
RestartSec=10
KillMode=process

[Install]
WantedBy=multi-user.target
$ sudo chmod 644 /etc/systemd/system/google-home.service

サービス開始
$ sudo systemctl daemon-reload
$ sudo systemctl enable google-home
$ sudo systemctl start google-home
Created symlink from /etc/systemd/system/multi-user.target.wants/google-home.service to /etc/systemd/system/google-home.service.
$ sudo systemctl status google-home
$ sudo journalctl -f -u google-home
もし google-home.service ファイルを別なフォルダで管理して、 /etc/systemd/system にシンボリックリンクを貼った場合には以下のエラーで実行することができませんでした。

$ sudo systemctl enable google-home
Failed to execute operation: No such file or directory
そのため、自動起動設定を行ってからシンボリックリンクを作成しました。

IFTTT で Google Home Mini と Node.js の連携を設定

IFTTT の My Applets から「New Applet」を押して追加します。

  1. 「this」は「Google Assistant」を選択
    1. 「Say a phrase with a text ingredient」を選択
    2. 「What do you want to say?」と「What do you want the Assistant to say in response?」と「Language」を設定
  2. 「that」は「Webhooks」を選択
    1. 「Make a web request」を選択
    2. 「URL」には、 Firebase で作成したデータの URLをコピー
    3. 「Method」は PUT
    4. 「Content Type」は application/json
    5. 「Body」は "{{TextField}}"


確認

正しく設定できていれば、 Google Home に「プレステを起動」と話かけることでご自身の PlayStation4 が起動するはずです。

2017年1月7日土曜日

Raspberry Pi に Homebridge をセットアップする

MacBook ProにHomebridgeをセットアップしたら感動したので、Raspberry Piを購入してセットアップしてみました。

Raspberry Pi 3 Model BにNOOBSをインストール

セットアップするのに必要なもの

  • Raspberry Pi
  • microUSB電源ケーブル & アダプタ (2.5A以上推奨 )
  • SDカード ( 4GB以上 )
  • キーボード & マウス ( USBタイプ )
  • HDMIディスプレイ
  • 他のコンピュータ( Raspberry PiのOSをダウンロード & SDカードにコピーするため )
マウスなどは元々持っていたので、以下のものを購入しました。


OSのインストール

公式ページの手順に従います。今回は「NOOBS」を使っています。
https://www.raspberrypi.org/documentation/installation/

NOOBSをダウンロード

1GB程度ですが、ダウンロードに12時間かかると表示されて全然進まなかったので、BitTorrent版のイメージをダウンロードしました。

NOOBS
Version 2.1.0
Release date: 2016-11-29

SDカードにNOOBSをコピー

注意点ですが、SDカードは「FAT32」でフォーマットする必要があります。
手持ちのSDカードは64GBだったので、「exFAT」でフォーマットしていましたが認識してくれませんでした。Windows 10の標準フォーマッタでは「exFAT」 以外を選択することが出来なかったため、OS Xの「ディスクユーティリティ」を使いました。

「NOOBS_v2_1_0.zip」を展開したら、そのままSDカードにコピーします。

Raspberry Piの起動

SDカード、キーボード&マウス、HDMIケーブル、電源を接続すると自動的に起動します。
起動後、「Raspbian [RECOMMENDED]」を選択し、左上の「Install」をクリックしてインストール作業を継続します。
プログレスバーが100%になるまで待ちましょう。

Raspberry Piの設定

Raspberry Piのデスクトップ画面が表示されます。左上のRaspberry Piマークが、Windowsでいうスタートメニューになっています。
[Preference] > [Raspberry Pi Configuration]で設定画面を開き、
  • System
    • Change Password
      • パスワードを変更します。デフォルトは「raspberry」になっています
  • Interface
    • SSH: Enable
      • sshログインが出来るようにします
  • Localisation
    • Locale
      • Language: ja (Japanese)
      • Country: JP (Japan)
      • Character Set: UTF-8
    • Timezone
      • Area: Japan
    • Keyboard: US
      • ご自身のキーボードを選択します
    • WiFi Country: JP Japan

Wi-Fiのセットアップ

右上のWi-Fiアイコンをクリックし、ご自身のSSIDを選択します。

Raspberry Piの基本的なセットアップは以上です。

Raspberry Pi のパッケージ整理

不要なパッケージを削除

個人的には以下のパッケージが不要なので削除しました。
  • Wolframe
  • Sonic pi
  • Scratch
  • LibreOffice
$ sudo apt-get purge wolfram-engine sonic-pi scratch libreoffice*
$ sudo apt-get clean
$ sudo apt-get autoremove

パッケージを最新にする

$ sudo apt-get update
$ sudo apt-get upgrade

念のため日本語フォントをインストール

$ sudo apt-get install fonts-ipafont fonts-ipaexfont

ntpdの設定

$ sudo vi /etc/ntp.conf
-server 0.debian.pool.ntp.org iburst
-server 1.debian.pool.ntp.org iburst
-server 2.debian.pool.ntp.org iburst
-server 3.debian.pool.ntp.org iburst
+#server 0.debian.pool.ntp.org iburst
+#server 1.debian.pool.ntp.org iburst
+#server 2.debian.pool.ntp.org iburst
+#server 3.debian.pool.ntp.org iburst
+pool ntp.nict.jp ibrust

$ sudo service ntp restart
$ ntpq -p

Homebridge のインストール

参考: https://github.com/nfarina/homebridge/wiki/Running-HomeBridge-on-a-Raspberry-Pi

Git

$ git --version
git version 2.1.4

Make

$ make -v
GNU Make 4.0

GCC

$ g++ -v
gcc version 4.9.2 (Raspbian 4.9.2-10)

Node.js

curl -sL https://deb.nodesource.com/setup_6.x | sudo -E bash -
sudo apt-get install -y nodejs

Anahi header (Avashは最初からインストール済み)

$ sudo apt-get install libavahi-compat-libdnssd-dev

Homebridge

$ sudo npm install -g --unsafe-perm homebridge

起動できるかを確認します。
$ homebridge

Homebridgeのデーモン化 (System)

設定のダウンロードと修正

$ sudo curl -L -o /etc/default/homebridge https://gist.githubusercontent.com/johannrichard/0ad0de1feb6adb9eb61a/raw/1cf926e63e553c7cbfacf9970042c5ac876fadfa/homebridge
$ sudo vi /etc/default/homebridge
-HOMEBRIDGE_OPTS=-U /var/lib/homebridge
+HOMEBRIDGE_OPTS=-U /var/homebridge

$ sudo curl -L -o /etc/systemd/system/homebridge.service https://gist.githubusercontent.com/johannrichard/0ad0de1feb6adb9eb61a/raw/1cf926e63e553c7cbfacf9970042c5ac876fadfa/homebridge.service
$ sudo chmod 755 /etc/systemd/system/homebridge.service
$ sudo vi /etc/systemd/system/homebridge.service
-ExecStart=/usr/local/bin/homebridge $HOMEBRIDGE_OPTS
+ExecStart=/usr/bin/homebridge $HOMEBRIDGE_OPTS

systemsへの登録

$ sudo useradd --system homebridge
$ sudo mkdir /var/homebridge
$ sudo chown homebridge:homebridge /var/homebridge
$ sudo su homebridge -s /bin/bash

homebridge$ vi /var/homebridge/config.json
{
    "bridge": {
        "name": "Homebridge",
        "username": "XX:XX:XX:XX:XX:XX",
        "port": 51826,
        "pin": "031-45-154"
    },

    "description": "Raspberry Pi",

    "accessories": [],

    "platforms": [{
        "platform": "cmdSwitch2",
        "switches": [{
            "name": "Link Station",
            "on_cmd": "/home/pi/Projects/HomeKit/link_station.rb on",
            "off_cmd": "/home/pi/Projects/HomeKit/link_station.rb off",
            "state_cmd": "/home/pi/Projects/HomeKit/link_station.rb state"
        }]
    }]}
}
homebridge$ exit

$ sudo systemctl daemon-reload
$ sudo systemctl enable homebridge

$ sudo systemctl start homebridge
$ sudo systemctl status homebridge
$ sudo journalctl -f -u homebridge

アクセサリの作成

Homebridgeの cmdSwitch2 で実行されるスクリプトをrubyで書いたのでインストールします。

homebridge-cmdswitch2

$ sudo npm install -g homebridge-cmdswitch2

Ruby

$ sudo apt-get install ruby2.1 ruby2.1-dev
$ sudo update-alternatives --install "/usr/bin/ruby" "ruby" "/usr/bin/ruby2.1" 1
$ sudo update-alternatives --install "/usr/bin/gem" "gem" "/usr/bin/gem2.1" 1

Ping

$ gem install net-ping

Nokogiri (結構時間かかりました)

$ gem install nokogiri

iOSの「ホーム」アプリにHomebridgeを追加

iOS 10の「ホーム」アプリを開いて、上記で設定した Homebridge を追加します。

sshでのログイン

sshでログインする場合には以下のようになります。

$ ssh pi@raspberrypi.local

2016年12月4日日曜日

Electronで作成したアプリから、WindowsやmacOS向けのインストーラを作成する最新方法

Electronで作成したアプリからインストーラを作成して、exeやdmg形式で配布する方法についてです。
色々とググってパッケージングの方法を調べてみるものの、いずれも electron-builder のバージョンが古く、最新のバージョンでのパッケージング方法が見当たらなかったので、まとめてみます。

※ 2017/05/15 (Mon) 追記: electron(v1.6.7) & electron-builder(v17.5.0) への対応を行いました。

まずは Electron のインストールからまとめます。

Node.js のインストール


Windows 10 Home

以下のURLからダウンロードしてインストール
https://nodejs.org

OS X El Capitan 10.11.6

$ brew install node

バージョンの確認

$ node -v
v7.2.0

$ npm -v
v3.10.9

Electronのインストール

$ npm install -g electron

$ electron -v
v1.6.7

electron-prebuilt は廃止予定でインストールする必要はありません。

サンプルプログラムの作成


一旦、electronのサンプルプログラムを作ります。公式ドキュメントの Quick Start に従って作ってみます。

作り終えると、以下のファイル構成になります。
/path/to/BuilderSample
├─ app
│ ├── index.html (アプリのメインページ)
│ ├── main.js (アプリのメインコード)
│ └── package.json (アプリの設定)
├─ build
│ ├── icon.icns (macOS用のアイコン)
│ └── icon.ico (Windows用のアイコン)
├─ node_modules (アプリ自体には含めないが、パッケージングに必要なモジュール群)
└─ package.json (アプリ自体には含めないが、パッケージングに必要な設定)

ソースコードはGitHubにて公開しています。
Electron-SampleCodes/BuilderSample - GitHub


プロジェクトフォルダと必要なファイルの作成

$ mkdir -p /path/to/BuilderSample/app
$ cd /path/to/BuilderSample/app
$ npm init

name: (app) app-sample
version: (1.0.0)
description: It's a sample.
entry point: (index.js) main.js
test command:
git repository:
keywords:
author: UQ Times <uqtimes@gmail.com>
license: (MIT)

main.js の作成
$ vim main.js

index.html の作成
$ vim index.html

作成したサンプルの実行
$ electron .


パッケージ作成の準備


「electron」と「electron-builder」のdev版が必要なので、ローカルにインストールします。
electron-packager」は無くてもパッケージングは出来るので今回はインストールしません。
インストールする場所ですが、配布するアプリケーションに含める必要はないため、appの親ディレクトリにインストールします。

$ cd /path/to/BuilderSample

electron dev版のインストール

$ nam install electron --save-dev

$ ./node_modules/.bin/electron -v
v1.6.7

electron-builder dev版のインストール

$ npm install electron-builder --save-dev

$ ./node_modules/.bin/build --version
17.5.0


Windows で Windows用のパッケージング

「NSIS」のインストールが必要となります。
http://nsis.sourceforge.net/Download
試している時点でのバージョンは、「NSIS 3.0 Released July 24, 2016」です。

インストール後、環境変数のPathに「C:\Program Files (x86)\NSIS」を追加します。 

macOS で Windows用のパッケージング

wineのインストールが必要です。
$ brew install wine

$ wine --version
wine-1.8.5

パッケージング用の package.json の作成
$ cd /path/to/BuilderSample/
$ vim package.json
{
  "name": "builder-sample",
  "version": "1.0.0",
  "author": "UQ Times <uqtimes@gmail.com>",
  "license": "MIT",
  "description": "",
  "main": "main.js",
  "build": {
    "appId": "jp.blogspot.uqtimes.samples.electron",
    "directories": {
      "app": "app"
    },
    "artifactName": "${productName}_installer.${ext}",
    "mac": {
      "category": "public.app-category.developer-tools",
      "target": "dmg"
    },
    "win": {
      "target": "nsis"
    }
  },
  "scripts": {
    "test": "echo \"Error: no test specified\" && exit 1",
    "pack": "npm run pack:mac && npm run pack:win",
    "pack:mac": "./node_modules/.bin/build --mac --x64",
    "pack:win": "./node_modules/.bin/build --win --x64"
  },
  "devDependencies": {
    "electron": "^1.6.7",
    "electron-builder": "^17.5.0"
  }
}

必要な箇所しか記載していないため、他のオプションについては electron-builder の Options から参照できます。

$ ./npm_modules/.bin/build --mac --x64
(もしくは)
$ npm run pack:mac
dist/mac 以下にパッケージングされたファイルが出力されています。

$ ./npm_modules/.bin/build --win --x64
(もしくは)
$ npm run pack:win
dist 以下にパッケージングされたファイルが出力されています。

それぞれ、"app"フォルダの中にあるElectronアプリケーションをビルドしてくれます。もし"app"というフォルダ名出ない場合には、package.json に directories の項目を追加することでビルド対象を変更することができます。

アプリのアイコン

デフォルトでは "build"以下にアイコンファイルを置いておくことで自動的にアイコンが設定されます。

アプリのアイコンは IconArchive などから探して使うことが出来ます。

2015年3月28日土曜日

GoのGXUIライブラリをOS XとWindowsで動かしてみた

久しぶりの更新ですが、Go言語のUIライブラリをOS X YosemiteとWindows 8.1で試したので、まとめます。

Googleが公開している"GXUI"です。クロスプラットフォームを実現するためにOpenGLを利用しています。まだまだ開発途中のようですが、UIのクロスプラットフォームを実現する言語は少ないので、期待しています。

GXUI - A Go cross platform UI library.
https://github.com/google/gxui

OS X Yosemite


Macでは簡単です。

Goのインストール

go getコマンド時に、GitとMercurialも必要です。
GOPATHはサンプルでは$HOMEを指定していますが、お好みの場所を指定してください。
$ brew install go

$ go version
go version go1.4.2 darwin/amd64

$ vim ~/.zshrc
export GOROOT=/usr/local/opt/go/libexec
export GOPATH=${HOME}
export PATH=${PATH}:${GOROOT}/bin:${GOPATH}/bin

$ . ~/.zshrc

GXUIのセットアップ

$ cd $GOPATH

$ go get code.google.com/p/freetype-go/freetype
$ go get github.com/go-gl/gl/v3.2-core/gl
$ go get github.com/go-gl/glfw/v3.1/glfw

$ go get github.com/google/gxui

サンプルプロジェクトの実行(2015/3/26に更新されていました)

$ go install github.com/google/gxui/samples/...

Windows 8.2

13インチMacBook Pro RetinaにBootcampでインストールしたものです。

Go言語はCygwinでの動作を保証されていないため、MinGW(64bit版)とMSYSをインストールしています。その際、以下のページを参考にさせて頂きました。

参考

WindowsにMinGWをインストールしてC/C++で開発(64bit版)
MinGW (64bit) + MSYS 環境の構築 (1)
Windows に MinGW-w64 と MSYS を導入する

7-Zipのインストール

7-Zip/
7z920-x64.zipをダウンロード&展開し、インストール

MinGW-w64のインストール

MinGW-w64 - for 32 and 64 bit Windows
「Toolchains targetting Win64 / Personal Builds / mingw-builds / 4.9.2 / threads-posix / seh / x86_64-4.9.2-release-posix-seh-rt_v4-rev2.7z」をダウンロード。

展開して出来た「mingw64」を「C:\」に移動 (C:\mingw64)

環境変数に追加

コントロールパネル > システムとセキュリティ > システム > システムの詳細設定 > 環境変数
システム環境変数 > Path を編集し、「C:\mingw64\bin」を追加

MSYSのインストール

MinGW-builds - Browse Files at SourceForge.net
「external-binary-packages / msys+7za+wget+svn+git+mercurial+cvs-rev13.7z」をダウンロード

展開して出来た「msys」を「C:\mingw64」に移動 (C:\mingw64\msys)

環境変数に追加

コントロールパネル > システムとセキュリティ > システム > システムの詳細設定 > 環境変数
システム環境変数 > Path を編集し、「C:\mingw64\msys\bin」を追加

git for windowsのインストール

Git for Windows

ダウンロードした「Git-1.9.5-preview20150319.exe」を実行し、インストール

環境変数に追加

コントロールパネル > システムとセキュリティ > システム > システムの詳細設定 > 環境変数
システム環境変数 > Path を編集し、「C:\Program Files (x86)\Git\bin」を追加


hgコマンドが必要なので、mercurialをダウンロード

Mercurial SCM

ダウンロードした「tortoisehg-3.3.2-x64.msi」 を実行し、インストール

環境変数は自動的に追加される

Goをインストール

The Go Programming Language

Bootcampなので、64bit Windows版をダウンロード
「go1.4.2.windows-amd64.zip」をダウンロードし、展開。

展開して出来た「go」を「C:\Go」として移動

環境変数に追加

コントロールパネル > システムとセキュリティ > システム > システムの詳細設定 > 環境変数
システム環境変数 > Path を編集し、「C:\Go\bin」を追加

また、新規の環境変数を作成し、GOROOTに「C:\Go」を指定します。

$ go version
go version go1.4.2 windows/amd64

環境変数を変更しても、OSの再起動は不要です。ただし、既にMSYSを起動している場合には、MSYSを終了します。


MSYSの起動と設定

「C:\mingw64\msys\msys.bat」を起動

MSYSのGitとMercurialのバージョンが古いのでリネーム

Git

$ mv /bin/git{,.OLD}
$ git --version
git version 1.9.5.msysgit.1
$ which git
/c/Program Files (x86)/Git/bin/git.exe

Mercurial

$ mv /bin/hg{,.OLD}
$ hg --version
Mercurial - 分散構成管理ツール(バージョン 3.3.2)
$ which hg
/c/Program Files (x86)/TortoiseHg/hg.exe

Goの環境設定

GOPATHはサンプルでは$HOMEを指定していますが、お好みの場所を指定してください。
$ cd ~/
$ vim .profile
. ~/.bashrc

$ vim .bashrc
export GOPATH=$HOME

$ . .profile

GXUIのセットアップ

後は、Macと同じ手順です。
$ cd $GOPATH

$ go get code.google.com/p/freetype-go/freetype
$ go get github.com/go-gl/gl/v3.2-core/gl
$ go get github.com/go-gl/glfw/v3.1/glfw

$ go get github.com/google/gxui

Cygwinの場合のエラー

$ go get github.com/go-gl/gl/v3.2-core/gl
/usr/lib/gcc/x86_64-pc-cygwin/4.9.2/../../../../x86_64-pc-cygwin/bin/ld: -lmingwex が見つかりません
/usr/lib/gcc/x86_64-pc-cygwin/4.9.2/../../../../x86_64-pc-cygwin/bin/ld: -lmingw32 が見つかりません
collect2: エラー: ld はステータス 1 で終了しました
同じエラーに遭遇している方もいるようです。
Issue 7265 - go - Windows/cgo: cannot find -lmingwex & cannot find -lmingw32 - The Go Programming Language - Google Project Hosting

サンプルプロジェクトの実行(2015/3/26に更新されていました)

$ go install github.com/google/gxui/samples/...

実行結果の比較


OS XWindows
file_dlg
image_viewer
linear_layout
lists
panels
polyedit
polygon
progress_bar
tree

2012年5月29日火曜日

MapKitサンプル1 - 地図の表示と操作

前回の「CoreLocationサンプル3 - ジオコーディング」に続いて、今回は地図の表示と操作です。
やはり緯度・経度の座標情報には、地図がなければ分かりづらいです。

iOS Developer Libraryの「位置情報対応プログラミングガイド」(英語版はMaking Your Application Location-Aware)に沿って、サンプルを公開します。


注意点

MapKitでは、Googleマップを利用しています。そのため、Googleマップの利用規約に従う必要があります。
詳細は、Googleマップの利用規約(Google Maps Terms of Service)(全文)をご覧ください。


実装手順

地図の表示

  • 「MapKit.framework」「CoreLocation.framework」の追加
    1. 単に地図を表示するだけならCoreLocationは不要ですが、様々な処理をするのに必要となります。
  • ヘッダのインポート
    #import <MapKit/MapKit.h>
    #import <CoreLocation/CoreLocation.h>
  • (必要ならば)プロトコルの宣言
    @interface ViewController : UIViewController <MKMapViewDelegate>
    @end
  • MKMapViewの作成
    1. InterfaceBuilderで追加するか、以下のようにして作成します
    - (void)viewDidLoad
    {
        // 画面全体に表示
        MKMapView *mapView = [[[MKMapView alloc] initWithFrame:CGRectMake(0, 0, 320, 460)] autorelease];
        [self.view addSubview:mapView];
        
        // ユーザの現在位置を表示
        _mapView.showsUserLocation = YES;
        
        // 地図の種類をハイブリッドにする
        _mapView.mapType = MKMapTypeHybrid;
        
        // デバイスの向きに合わせて地図を回転
        [_mapView setUserTrackingMode:MKUserTrackingModeFollowWithHeading animated:YES];
    }


3種類の座標

MKMapKitでは、以下の3種類の座標情報を扱い、地図を表示したり、各種操作をしたりします。
  • 地図座標(Map coordinates)
    • CoreLocationでも扱った「緯度・経度」の情報です。「-90 <= 緯度 <= +90」「-180 <= 経度 <= +180」となります。
  • 地図点(Map points)
    • 「地図座標」と同様ですが、地図をx,yの座標で管理します。「0.0 <= x <= 268435456.0」「0.0 <= y <= 268435456.0」となります。
  • 点(Points)
    • 地図全体に付けられているものではなく、デバイスのMKMapViewに対しての座標です。「0 < x < 320」「0 < y < 460」となり、画面にはどこの場所の地図が表示されているかなどをしてしています。

それぞれの座標は相互に変換することができ、変換方法は下記のとおりです。
変換元変換先変換方法
地図座標- (CGPoint)convertCoordinate:(CLLocationCoordinate2D)coordinate toPointToView:(UIView *)view
- (CGRect)convertRegion:(MKCoordinateRegion)region toRectToView:(UIView *)view
地図座標地図点MKMapPoint MKMapPointForCoordinate(
CLLocationCoordinate2D coordinate
);
地図点地図座標CLLocationCoordinate2D MKCoordinateForMapPoint(
MKMapPoint mapPoint
);
MKCoordinateRegion MKCoordinateRegionForMapRect(
MKMapRect rect
);
地図点- (CGPoint)pointForMapPoint:(MKMapPoint)mapPoint
- (CGRect)rectForMapRect:(MKMapRect)mapRect
地図座標- (CLLocationCoordinate2D)convertPoint:(CGPoint)point toCoordinateFromView:(UIView *)view
- (MKCoordinateRegion)convertRect:(CGRect)rect toRegionFromView:(UIView *)view
地図点- (MKMapPoint)mapPointForPoint:(CGPoint)point
- (MKMapRect)mapRectForRect:(CGRect)rect

その他、プロパティや有用なメソッドが多いため、徐々に追記します。

サンプル

ソースコードはGitHubにて公開しています。
iOS-SampleCodes/MapKitSample-MapView - GitHub


次回

次回は、「MapViewサンプル2 - 注釈の表示」です。

CoreLocationサンプル3 - ジオコーディング

前回は「CoreLocationサンプル2 - ヘディングイベント」でした。今回は、「緯度・経度から住所」「住所から緯度・経度」に変換するジオコーディングについてです。

iOS Developer Libraryの「位置情報対応プログラミングガイド」(英語版はMaking Your Application Location-Aware)に沿って、サンプルを公開します。

注意点

ジオコーディングは、サーバにリクエストを送り、サーバ側で処理をするものです。そのため、過度にジオコーディング要求をしてはいけません。詳細は「位置情報対応プログラミングガイド」23ページ目「Geocoderオブジェクトについて」をご覧ください。
また、MapKitを利用した逆ジオコーディングは、Googleマップの利用規約により、必ずGoogleマップと組み合わせなければなりません。他の会社の地図サービスなどに出力したりすることはできません。(Googleマップの利用規約(section 10.12)
詳細は、Googleマップの利用規約(Google Maps Terms of Service)(全文)をご覧ください。


正ジオコーディングと逆ジオコーディング

逆ジオコーディングはiOS 3.0以降ですが、正ジオコーディングはiOS 5.0以降でなければ使えません。
概要フレームワーク
正ジオコーディング「住所」→「緯度・経度」CoreLocation【iOS 5.0以降】
逆ジオコーディング「緯度・経度」→「住所」MapKit【iOS 3.0以降】【Deprecated in iOS 5.0
CoreLocation【iOS 5.0以降】
iOS 4.3以前にも対応させる必要があるならば、MapKitを使うことになり、正ジオコーディングは使えません。

実装手順

正ジオコーディング(CoreLocation)

  1. 「CoreLocation.framework」の追加
  2. ヘッダのインポート
    #import <CoreLocation/CoreLocation.h>
  3. 正・逆ジオコーディングの開始
    // インスタンスの生成
    CLGeocoder *geocoder = [[[CLGeocoder alloc] init] autorelease];
    
    // 正ジオコーディングの開始
    [geocoder geocodeAddressString:@"住所".text completionHandler:^(NSArray *placemarks, NSError *error) {
        if (error) {
            // エラーが発生している
        } else {
            for (CLPlacemark *p in placemarks) {
                // 複数の結果が存在する場合もある
            }
        }
    }];
    
    // 逆ジオコーディングの開始
    CLLocation *location = [[[CLLocation alloc] initWithLatitude:37.332708 longitude:-122.030336] autorelease];
    [geocoder reverseGeocodeLocation:location completionHandler:^(NSArray *placemarks, NSError *error) {
        if (error) {
            // エラーが発生している
        } else {
            if (0 < [placemarks count]) {
                // 結果はひとつしかない
            }
        }
    }];

MapKit.framework

  1. 「MapKit.framework」の追加
  2. ヘッダのインポート
    #import <MapKit/MapKit.h>
  3. MKReverseGeocoderDelegateプロトコルの宣言
    @interface ViewController : UIViewController <MKReverseGeocoderDelegate>
    @property (nonatomic, retain) MKReverseGeocoder *geocoder;
    @end
  4. 逆ジオコーディングの開始
    @synthesize geocoder = _geocoder;
    
    - (void)reverseGeocode:(CLLocationCoordinate2D)coord {
        self.geocoder = [[[MKReverseGeocoder alloc] initWithCoordinate:coord] autorelease];
        _geocoder.delegate = self;
        [_geocoder start];
    }
    ガイドラインに書かれている以下のような方法だと、MKReverseGeocoderオブジェクトが解放されずにiOS 5.0以降ではメモリリークします。(Xcode付属のサンプル「CurrentAddress」では正しく書かれています。)
    - (void)reverseGeocode:(CLLocationCoordinate2D)coord {
        // theGeocoderは解放されない
        MKReverseGeocoder *theGeocoder = [[MKReverseGeocoder alloc] initWithCoordinate:coord];
        theGeocoder.delegate = self;
        [theGeocoder start];
    }
  5. 逆ジオコーディングの受け取り
    /* エラー発生時 */
    - (void)reverseGeocoder:(MKReverseGeocoder *)geocoder didFailWithError:(NSError *)error
    {
        // ここで任意の処理
        NSLog(@"%s | %@", __PRETTY_FUNCTION__, error);
    }
    
    /* ジオコーディング成功時 */
    - (void)reverseGeocoder:(MKReverseGeocoder *)geocoder didFindPlacemark:(MKPlacemark *)placemark
    {
        // ここで任意の処理
    }
    

ジオコーディングの実行例

デバイスの言語の設定により、得られる情報が異なります。また、正ジオコーディング結果の緯度・経度も、regionも値が返ってくるわけでもないようです。

CoreLocationでの正ジオコーディングの例

住所緯度, 経度
東京タワー+35.658608, +139.745396
Apple Inc. 2 Infinite Loop+37.332708, -122.030336


MapKitでの逆ジオコーディング「東京タワー」の例(iOS 5.1)

プロパティ日本語環境英語環境
addressDictionary{
    City = "港区";
    Country = "日本";
    CountryCode = JP;
    FormattedAddressLines = (
        "日本",
        "東京都港区4丁目2−8"
    );
    State = "東京都";
    Street = "4丁目 2−8";
    SubLocality = "芝公園";
    SubThoroughfare = "2−8";
    Thoroughfare = "4丁目";
}
{
    City = Minato;
    Country = Japan;
    CountryCode = JP;
    FormattedAddressLines = (
        Japan,
        "Tokyo, Minato, Shibakoen, 4丁目2−8"
    );
    State = Tokyo;
    Street = "4丁目 2−8";
    SubLocality = Shibakoen;
    SubThoroughfare = "2−8";
    Thoroughfare = "4丁目";
}
administrativeArea東京都Tokyo
areasOfInterest(null)(null)
country日本Japan
inlandWater(null)(null)
locality港区Minato
name(null)(null)
ocean(null)(null)
postalCode(null)(null)
region(null)(null)
subAdministrativeArea(null)(null)
subLocality芝公園Shibakoen
subThoroughfare2−82−8
thoroughfare4丁目4丁目

MapKitでの逆ジオコーディング「Apple Inc.」の例(iOS 5.1)

プロパティ日本語環境英語環境
addressDictionary{
    City = "クパチーノ";
    Country = "アメリカ合衆国";
    CountryCode = US;
    FormattedAddressLines = (
        "2 インフィニート・ループ",
        "クパチーノ カリフォルニア 95014",
        "アメリカ合衆国"
    );
    State = "カリフォルニア";
    Street = "2 インフィニート・ループ";
    SubThoroughfare = 2;
    Thoroughfare = "インフィニート・ループ";
    ZIP = 95014;
}
{
    City = Cupertino;
    Country = "United States";
    CountryCode = US;
    FormattedAddressLines = (
        "2 Infinite Loop",
        "Cupertino, CA 95014",
        USA
    );
    State = California;
    Street = "2 Infinite Loop";
    SubThoroughfare = 2;
    Thoroughfare = "Infinite Loop";
    ZIP = 95014;
}
administrativeAreaカリフォルニアCalifornia
areasOfInterest(null)(null)
countryアメリカ合衆国United States
inlandWater(null)(null)
localityクパチーノCupertino
name(null)(null)
ocean(null)(null)
postalCode9501495014
region(null)(null)
subAdministrativeArea(null)(null)
subLocality(null)(null)
subThoroughfare22
thoroughfareインフィニート・ループInfinite Loop

CoreLocationでの逆ジオコーディング「東京タワー」の例(iOS 5.1)

プロパティ日本語環境英語環境
addressDictionary{
    City = "東京";
    Country = "日本";
    CountryCode = JP;
    FormattedAddressLines = (
        "東京タワー",
        "〒105-0011",
        "東京 港区",
        "芝公園 4丁目2番",
        "日本"
    );
    Name = "東京タワー";
    State = "東京";
    Street = "芝公園 4丁目2番";
    SubLocality = "芝公園";
    SubThoroughfare = "2番";
    Thoroughfare = "芝公園 4丁目2番";
    ZIP = "〒105-0011";
}
{
    City = Minato;
    Country = Japan;
    CountryCode = JP;
    FormattedAddressLines = (
        "Tokyo Tower",
        "〒105-0011",
        "Tokyo Minato",
        "2, Shibakoen 4-Chōme",
        Japan
    );
    Name = "Tokyo Tower";
    State = Tokyo;
    Street = "2, Shibakoen 4-Chōme";
    SubLocality = Shibakoen;
    SubThoroughfare = 2;
    Thoroughfare = "Shibakoen 4-Chōme";
    ZIP = "〒105-0011";
}
administrativeArea東京Tokyo
areasOfInterest("東京タワー")("Tokyo Tower")
country日本Japan
inlandWater(null)(null)
locality港区Minato
name東京タワーTokyo Tower
ocean(null)(null)
postalCode〒105-0011〒105-0011
region(identifier <+35.65860800,+139.74534650> radius 133.46) <+35.65860800,+139.74534650> radius 133.46m(identifier <+35.65860800,+139.74534650> radius 133.46) <+35.65860800,+139.74534650> radius 133.46m
subAdministrativeArea(null)(null)
subLocality芝公園Shibakoen
subThoroughfare2番2
thoroughfare芝公園 4丁目Shibakoen 4-Chōme

CoreLocationでの逆ジオコーディング「Apple Inc.」の例(iOS 5.1)

プロパティ日本語環境英語環境
addressDictionary{
    City = "クパチーノ";
    Country = "合衆国";
    CountryCode = US;
    FormattedAddressLines = (
        "Apple Inc.",
        "2 Infinite Loop",
        "Cupertino, CA 95014-2083",
        "合衆国"
    );
    Name = "Apple Inc.";
    PostCodeExtension = 2083;
    State = "カリフォルニア";
    Street = "2 Infinite Loop";
    SubAdministrativeArea = "サンタクララ";
    SubLocality = "Bay Area";
    SubThoroughfare = 2;
    Thoroughfare = "Infinite Loop";
    ZIP = 95014;
}
{
    City = Cupertino;
    Country = "United States";
    CountryCode = US;
    FormattedAddressLines = (
        "Apple Inc.",
        "2 Infinite Loop",
        "Cupertino, CA 95014-2083",
        "United States"
    );
    Name = "Apple Inc.";
    PostCodeExtension = 2083;
    State = California;
    Street = "2 Infinite Loop";
    SubAdministrativeArea = "Santa Clara";
    SubLocality = "Bay Area";
    SubThoroughfare = 2;
    Thoroughfare = "Infinite Loop";
    ZIP = 95014;
}
administrativeAreaカリフォルニアCalifornia
areasOfInterest("Apple Inc.")("Apple Inc.")
country合衆国United States
inlandWater(null)(null)
localityクパチーノCupertino
nameApple Inc.Apple Inc.
ocean(null)(null)
postalCode9501495014
region(identifier <+37.33100000,-122.03085000> radius 414.66) <+37.33100000,-122.03085000> radius 414.66m(identifier <+37.33100000,-122.03085000> radius 414.66) <+37.33100000,-122.03085000> radius 414.66m
subAdministrativeAreaサンタクララSanta Clara
subLocalityBay AreaBay Area
subThoroughfare22
thoroughfareInfinite LoopInfinite Loop


サンプル

ソースコードはGitHubにて公開しています。
  1. CoreLocationを利用
    1. MapKitを利用

      CoreLocationを利用したサンプル


      MapKitを利用したサンプル


      今回はサンプルでUITableViewやUIMapViewを利用していますが、残念ながらiOS 5.1ではUIScrollViewが内部でメモリリークしています。
      フォーラムでも報告されており「Developer Forums: iOS 5.1 libsystem_c.dylib leaks memory when UIScrollview scrolling hits a bound」、日本語の説明ですと「iOS 5.1 ではスクロールビューをスクロールするたびに少しずつメモリリークが起こる。 - 24/7 twenty-four seven」にも書かれております。
      そのため、UIScrollViewを継承しているUITableViewやUIMapViewでも同様にメモリリークしてしまいます。

      次回

      次回は、「MapKitサンプル1 - 地図の表示」です。

      2012年5月27日日曜日

      CoreLocationサンプル2 - ヘディングイベントを利用した画面の回転

      前回の「CoreLocationサンプル1 - 現在位置の取得と領域観測 」に続いて、今回はヘディングイベントです。前回と重複している部分もありますが、iOS Developer Libraryの「位置情報対応プログラミングガイド」(英語版はMaking Your Application Location-Aware)に沿って、サンプルを公開します。

      方向関連のイベント

      • ヘディング(heading)【iOS 4.0以降】
        • 磁力センサーを利用して、「北」がどちらにあるかを計測します。単純に「北」と言っても、以下の二種類があり、どちらを示すかで方角が少し変わってきます。ヘディングでは両方を扱うことができます。詳細は「真北 - Wikipedia」「真北とは? | 用語集とGISの使い方 | 株式会社パスコ」などをご覧ください。
          • 磁北(じほく/magnetic north): 地球の磁場上の北です。(普通の)コンパスなどを使った場合に示されるものとなります。デバイスに内蔵されている磁力センサーを使って磁北を求めることができます。
          • 真北(しんぽく/true north): 普段の生活で良く使われる地図上の北です。北極点へと向かう線となります。磁北と真北はズレている為、現在地を元にしてそのズレを修正するものです。つまり、磁力センサーと現在地情報の両方が必要となります。
      • コース(course)【iOS 2.2以降】

      標準アプリ「コンパス」でも「真北」と「磁北」を切り替えられます。


      実装手順

      1. 「CoreLocation.framework」の追加
      2. 必要に応じて、<project-name>-Info.plistファイルにキー「location-services」「magnetometer」「gps」を追加する。
        • ただし、現在位置の情報や磁力センサー、GPSが無くともアプリケーションが正常に動作する場合には追加すべきではありません。(UIRequiredDeviceCapabilitiesについての詳細は「iOSデバイス間の互換性まとめ」をご覧下さい。)
      3. ヘッダのインポート
        #import <CoreLocation/CoreLocation.h>
        
      4. CLLocationManagerDelegateプロトコルの宣言
        @interface ViewController : UIViewController <CLLocationManagerDelegate>
        @end
      5. (真北の情報が必要であれば)位置情報サービスの開始
      6. ヘディングイベントの開始
      7. ヘディングイベント情報の受け取り
      8. (不必要になったら)ヘディングイベント(と位置情報サービス)の停止

      磁北の取得

      1. ヘディングイベントの開始
        // プロパティではなくクラスメソッドです
        if ([CLLocationManager headingAvailable]) {
            // インスタンスを生成し、デリゲートの設定
            _manager = [[CLLocationManager alloc] init];
            _manager.delegate = self;
            _manager.headingFilter = kCLHeadingFilterNone;  // 更新頻度
            _manager.headingOrientation = CLDeviceOrientationPortrait;  // 基準とする向き
        
            [_locationManager startUpdatingHeading];
        }
        iOS 3.xにも対応させる必要がある場合はプロパティ【Deprecated in iOS 4.0】を使います。
        // インスタンスの生成
        _manager = [[CLLocationManager alloc] init];
        if (_manager.headingAvailable || [CLLocationManager headingAvailable]) {
            // 必要な設定をして、ヘディングイベントの開始
        }
      2. ヘディング情報の受け取り
        - (void)locationManager:(CLLocationManager *)manager didUpdateHeading:(CLHeading *)newHeading
        {
            // ここで任意の処理
            CLLocationDirection heading = newHeading.magneticHeading;
        }
        
      3. (不必要になったら)ヘディングイベントの停止
        if ([CLLocationManager headingAvailable]) {
            [_manager stopUpdatingHeading];
        }

      真北の取得

      1. ヘディングイベントの開始
        // 位置情報サービスの開始
        if ([CLLocationManager locationServicesEnabled]) {
            _manager.desiredAccuracy = kCLLocationAccuracyBest;     
            _manager.distanceFilter = kCLDistanceFilterNone;
            [_manager startUpdatingLocation];
        }
        
        // ヘディングイベントの開始
        if ([CLLocationManager headingAvailable]) {  // プロパティではなくクラスメソッドです
            // インスタンスを生成し、デリゲートの設定
            _manager = [[CLLocationManager alloc] init];
            _manager.delegate = self;
            _manager.headingFilter = kCLHeadingFilterNone;
            _manager.headingOrientation = CLDeviceOrientationPortrait;
        
            [_locationManager startUpdatingHeading];
        }
        
      2. ヘディングイベント情報の受け取り
        - (void)locationManager:(CLLocationManager *)manager didUpdateHeading:(CLHeading *)newHeading
        {
            // ここで任意の処理
            CLLocationDirection heading = newHeading.trueHeading;
        }
        
      3. (不必要になったら)ヘディングイベントと位置情報サービスの停止
        if ([CLLocationManager headingAvailable]) {
            [_manager stopUpdatingHeading];
            [_manager stopUpdatingLocation];
        }


      CLLocationManager

      デバイスが機能を備えているかどうか

      • ヘディングイベントを扱えるか【iOS 4.0以降】
        + (BOOL)headingAvailable __OSX_AVAILABLE_STARTING(__MAC_10_7,__IPHONE_4_0);
        
        iOS 3.xでも使いたい場合【Deprecated in iOS 4.0
        @property(readonly, nonatomic) BOOL locationServicesEnabled __OSX_AVAILABLE_BUT_DEPRECATED(__MAC_NA,__MAC_NA,__IPHONE_2_0,__IPHONE_4_0);
        デバイスに、磁力センサーの機能があるかを確認する。【iOS 4.0以降】

      ヘディングイベントの挙動を設定

      • 次回の更新までの角度【iOS 3.0以降】
        @property(assign, nonatomic) CLLocationDegrees headingFilter __OSX_AVAILABLE_STARTING(__MAC_NA,__IPHONE_3_0);
        // 定義
        typedef double CLLocationDegrees;
        
        指定の角度動いたらヘディングイベントを生成する。単位は度数。kCLHeadingFilterNoneを指定すると、角度ではなく、動く度にイベントが通知されるようになります。デフォルトは1度です。

      • デバイスで基準とする向き【iOS 4.0以降】
        @property(assign, nonatomic) CLDeviceOrientation headingOrientation __OSX_AVAILABLE_STARTING(__MAC_NA,__IPHONE_4_0);
        // 定義
        typedef enum {
            CLDeviceOrientationUnknown = 0,
            CLDeviceOrientationPortrait,
            CLDeviceOrientationPortraitUpsideDown,
            CLDeviceOrientationLandscapeLeft,
            CLDeviceOrientationLandscapeRight,
            CLDeviceOrientationFaceUp,
            CLDeviceOrientationFaceDown
        } CLDeviceOrientation;
        
        デバイスのどの向きが基準となるかを決める。例えば、ホームボタンを右にして横向きに持った状態で北を設定した場合は「CLDeviceOrientationLandscapeLeft」を指定します。デフォルトはCLDeviceOrientationPortrait。
        イメージ定数説明
        無し
        CLDeviceOrientationUnknown無視される
        CLDeviceOrientationPortrait画面上部を北とする
        CLDeviceOrientationPortraitUpsideDown画面下部を北とする
        CLDeviceOrientationLandscapeLeft画面右部を北とする
        CLDeviceOrientationLandscapeRight画面左部を北とする
        画面が表(上)
        CLDeviceOrientationFaceUp無視される
        画面が裏(下)
        CLDeviceOrientationFaceDown無視される

      利用開始

      • ヘディングイベント【iOS 3.0以降】
        - (void)startUpdatingHeading __OSX_AVAILABLE_STARTING(__MAC_NA,__IPHONE_3_0);

      • キャリブレーション表示を隠す【iOS 3.0以降】
        - (void)dismissHeadingCalibrationDisplay __OSX_AVAILABLE_STARTING(__MAC_NA,__IPHONE_3_0);
        周りに磁力の強いものがあったりすると、正しく磁力センサーが働かなくなってしまう。その場合は下図のように、iOSが自動的に「8の字に振ってください」とのメッセージを表示するのだが、それを隠す。このメソッドを利用しなくても、キャリブレーションが成功すれば自動的に隠れます。(locationManagerShouldDisplayHeadingCalibrationを使わない場合に使用するのだろうが、使いどころが不明です)

      利用停止

      • ヘディングイベント【iOS 3.0以降】
        - (void)stopUpdatingHeading __OSX_AVAILABLE_STARTING(__MAC_NA,__IPHONE_3_0);

      情報の取得

      • ヘディング情報の取得【iOS 4.0以降】
        @property(readonly, nonatomic) CLHeading *heading __OSX_AVAILABLE_STARTING(__MAC_NA,__IPHONE_4_0);
        
        最新のヘディング情報が格納されている。デリゲートを利用しない場合にも利用できる。

      CLLocationManagerDelegate

      情報の更新時

      • ヘディング情報の更新時【iOS 3.0以降】
        - (void)locationManager:(CLLocationManager *)manager
               didUpdateHeading:(CLHeading *)newHeading __OSX_AVAILABLE_STARTING(__MAC_NA,__IPHONE_3_0);
        ヘディング情報が更新された際に呼ばれる。
      • キャリブレーション表示をするかどうか【iOS 3.0以降】
        - (BOOL)locationManagerShouldDisplayHeadingCalibration:(CLLocationManager *)manager  __OSX_AVAILABLE_STARTING(__MAC_NA,__IPHONE_3_0);
        周りに磁力の強いものがあったりすると、正しく磁力センサーが働かなくなってしまう。その場合に、「8の字に振ってください」とのメッセージを表示するかどうかを返す。表示しないと磁力センサーの値がおかしいまま修正されません。
        デザイン的に表示してほしくない場合などにNOを返すと良いのか?(使いどころが不明です。)


      CLHeading

      ヘディング情報

      • 磁北の角度【iOS 3.0以降】
        @property(readonly, nonatomic) CLLocationDirection magneticHeading;
        // 定義
        typedef double CLLocationDirection;
        
        磁北の角度を取得する。0.0から359.9の値で、0(北),90(東),180(南),270(西)となる。
      • 真北の角度【iOS 3.0以降】
        @property(readonly, nonatomic) CLLocationDirection trueHeading;
        // 定義
        typedef double CLLocationDirection;
        
        真北の角度を取得する。0.0から359.9の値で、0(北),90(東),180(南),270(西)となる。

      取得した情報の精度

      • 精度【iOS 3.0以降】
        @property(readonly, nonatomic) CLLocationDirection headingAccuracy;
        // 定義
        typedef double CLLocationDirection;
        
        磁北の方角と、計測された磁力から導き出した方角とのズレを角度で示す。値が小さいほど正確な磁北を示す。しかし、キャリブレーションが正しく行われていない場合など、負の値になる。
      • 計測された磁力の数値【iOS 3.0以降】
        @property(readonly, nonatomic) CLHeadingComponentValue x;
        @property(readonly, nonatomic) CLHeadingComponentValue y;
        @property(readonly, nonatomic) CLHeadingComponentValue z;
        
        それぞれの方向の磁力センサーから得られた磁力をマイクロテスラで示す。-128から+128までの正規化された値になる。


      サンプル

      ソースコードはGitHubにて公開しています。
      iOS-SampleCodes/CoreLocationSample-HeadingRelated - GitHub

      「設定 > 位置情報サービス >システムサービス > コンパスの調整」について


      電池の持ちを良くするためとして、位置情報サービスのシステムサービスの全てをオフにしていました。ただ、「コンパスの調整」だけは意味が分からないままだったので、今回はこれが原因でハマりました。このスイッチの意味は、iPhoneのユーザーズガイドにも詳細な説明は書かれておらず、色々と調べても分からずに疑問だったのですが、磁力センサーを利用して方角の計測をするときに「磁北」だけではなく「真北」も自動的に計測するというもののようです。
      • コンパスの調整「オン」
        • 磁北だけではなく、真北も自動で計測する。その際「ステータスバーアイコン」も「オン」になっていれば、ステータスバーの右上に矢印を表示する。
      • コンパスの調整「オフ」
        • 磁北のみで、真北は"利用できない"

      つまり、「コンパスの調整」がオフのままだと、「真北」の利用が出来なくなります。その時の、標準アプリ「コンパス」の例です。真北の選択ができません。

      今回のサンプルの場合は以下の通りです。コンパスの針に見立てた「^」が北を示します。ボタンを押すことで、磁北と真北とを切り替えることもできます。ですが、位置情報サービス(startUpdatingLocation)をオンにしても、真北の情報(trueHeading)を得られませんでした。

      そこで、「コンパスの調整」を「オン」にすると真北が利用できるようになりました。

      下図のように、アプリの標準位置情報サービスはまだオンになっていないのに、バックグラウンドで位置情報を取得し、真北を計算しています。この時表示されている矢印は「コンパスの調整」が自動的に位置情報を取得して真北を計算しているようです。それを表示するかしないかの判定が「ステータスバーアイコン」ということになります。
      上の方で、真北を得るためには「startUpdatingLocation」と「startUpdatingHeading」の両方が必要だと書いたのですが、位置情報サービスを開始しても真北を得られないとなると、それは困ります。ご存知の方、ご教示いただけると幸いです。

      「磁北」と「真北」の違い。若干、示す角度が異なっています。

      iPod touch(第4世代)では、磁力センサーがないため、電子コンパスとして利用できません。


      次回

      次回は、「CoreLocationサンプル3 - ジオコーディング」です。